
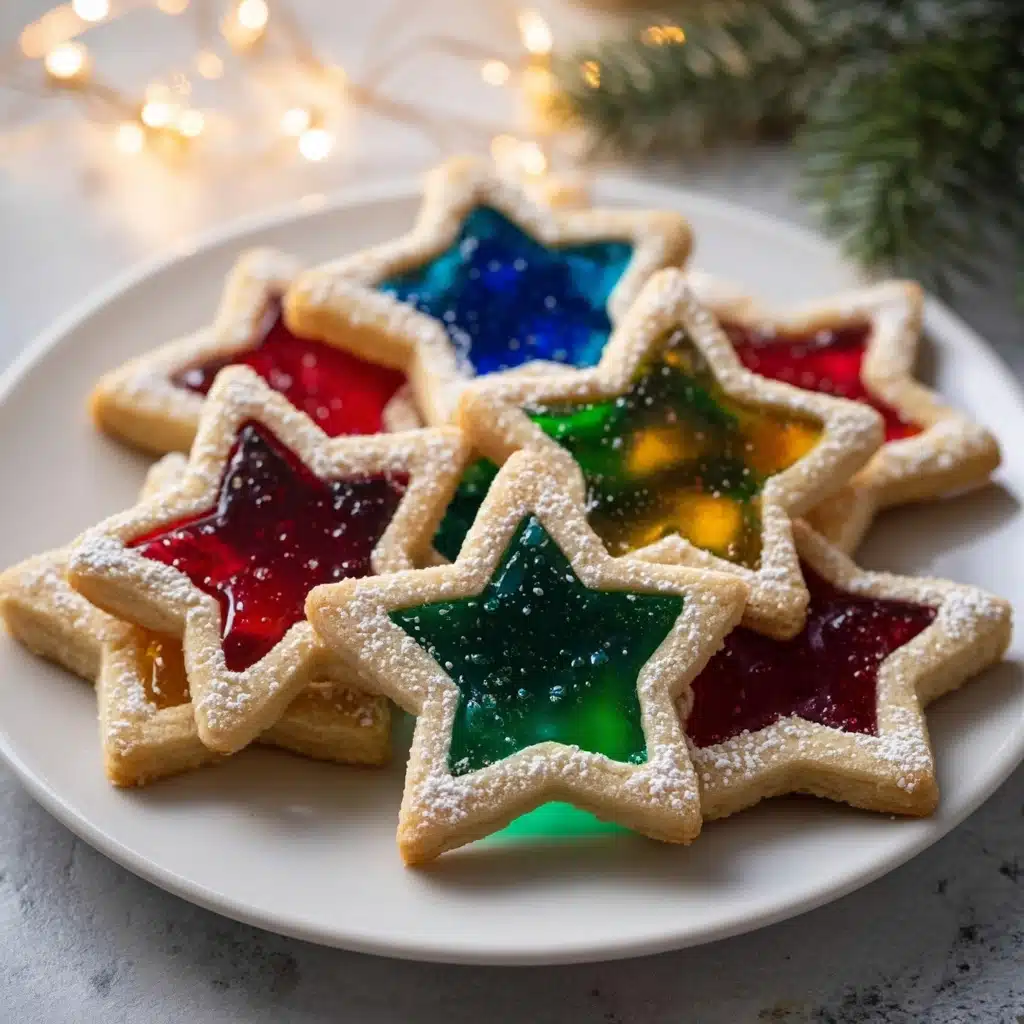
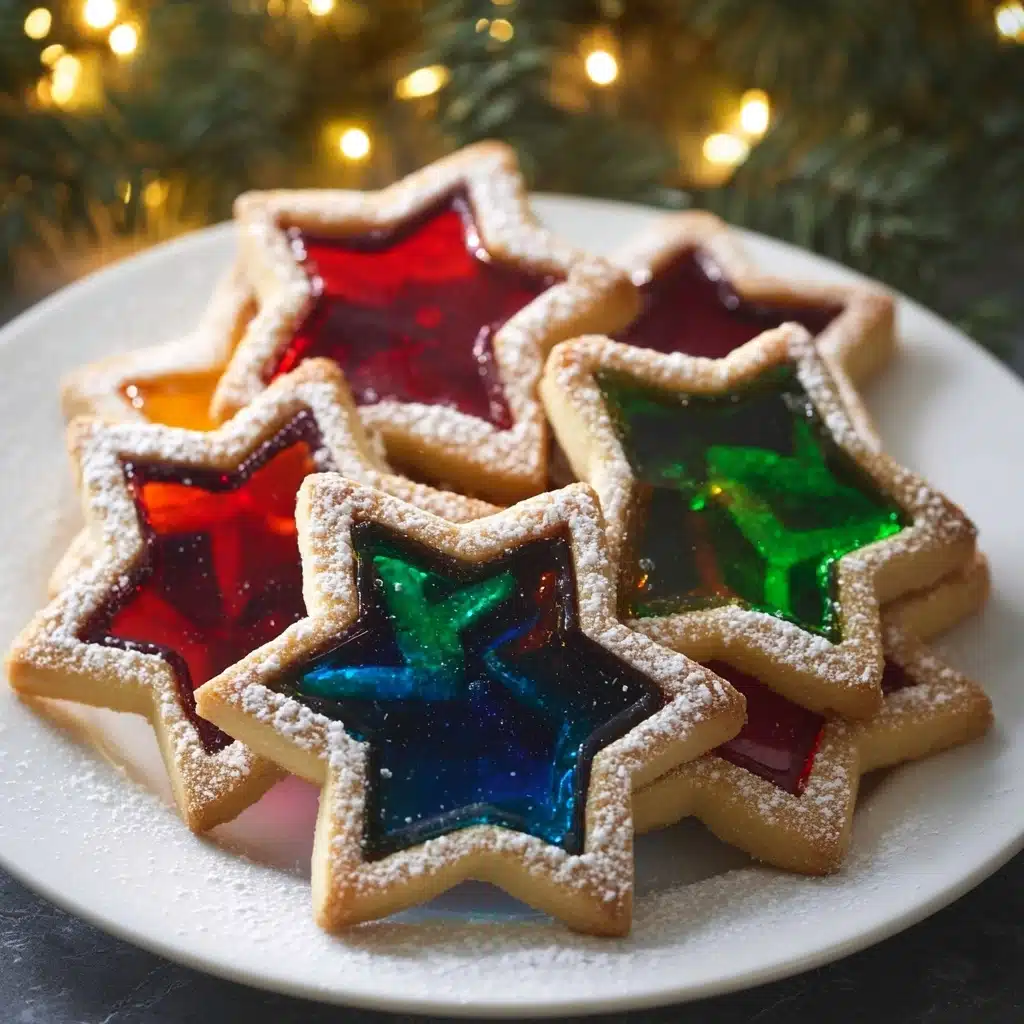
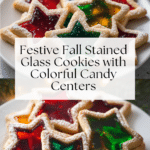
Stained Glass Cookies Recipe
If you’re looking for a cookie that dazzles both the eye and the palate, the Stained Glass Cookies Recipe is an absolute must-try. These charming cookies combine tender, buttery dough with vibrant, glossy candy centers that look like miniature works of colorful stained glass windows. Perfect for holidays, parties, or just brightening any day, these cookies bring a touch of magic and sparkle to your cookie jar with their translucent candy centers and delicate texture. Whether you’re an experienced baker or a cheerful kitchen experimenter, these show-stopping cookies are sure to become a beloved favorite.
Ingredients You’ll Need
The beauty of this recipe lies in its simple, everyday ingredients that come together to create something truly special. Each component plays an important role in the taste, texture, and that iconic stained glass effect, making the process as rewarding as the result.
- 2 ¾ cups all-purpose flour: Provides the perfect balance of structure and tenderness for the cookie base.
- 1 teaspoon baking powder: Helps the cookies rise gently, keeping them light and airy.
- ¼ teaspoon salt: Enhances all the flavors, keeping the sweetness in check.
- 1 cup (2 sticks) unsalted butter, softened: Adds rich flavor and moist, melt-in-your-mouth texture.
- 1 cup granulated sugar: Sweetens the dough for a classic cookie taste.
- 1 large egg: Binds all the ingredients together and adds a little lift.
- 1 teaspoon vanilla extract: Brings warmth and depth to the flavor profile.
- ½ teaspoon almond extract (optional): Offers a subtle, nutty nuance that makes these cookies extra special.
- Assorted hard candies (like Jolly Ranchers or Life Savers), separated by color and crushed: Create the stunning, jewel-like centers that define stained glass cookies.
- Powdered sugar: For a delicate dusting finish, adding a touch of elegance.
- Ribbon or string: Optional, perfect if you want to hang the cookies as festive ornaments.
How to Make Stained Glass Cookies Recipe
Step 1: Prepare the Dough
Start by whisking together the flour, baking powder, and salt in a medium bowl to combine the dry ingredients evenly. In a separate large bowl, cream the softened butter and granulated sugar until the mixture becomes light and fluffy — this is key to achieving that tender texture. Beat in the egg, vanilla extract, and almond extract if you’re using it, making sure to scrape down the sides for even mixing. Gradually add the dry ingredients to the wet mixture, combining just until everything comes together. Form the dough into a disk, wrap it tightly in plastic wrap, and pop it into the fridge to chill for at least 1 hour. This step helps the dough firm up, making it easier to roll out and cut.
Step 2: Prepare the Candies
While your dough chills, it’s time to prepare those gorgeous stained glass centers. Separate your hard candies by color into zip-top bags — this is essential for achieving the perfect look. Use a rolling pin or meat mallet to gently crush the candies into small pieces, careful not to grind them too fine or leave big chunks. Those little candy shards will melt evenly and create that translucent window effect once baked. Set each color aside in individual bowls.
Step 3: Shape the Cookies
Preheat your oven to 350°F (175°C) and line two baking sheets with parchment paper for easy cleanup. On a lightly floured surface, roll out the chilled dough to about ¼-inch thickness; this thickness allows the cookies to bake just right without overpowering the candy centers. Use a large cookie cutter to cut out your shapes, then use a smaller cutter of the same shape to remove the centers, creating perfect cookie frames ready for filling. Carefully transfer these to your baking sheets. Spoon the crushed candy pieces into the cut-out centers, spreading gently and evenly so the candy will melt and fuse beautifully.
Step 4: Bake and Cool
Bake the cookies for 8 to 10 minutes, just until the edges start to turn a soft golden color and the candy centers have melted into smooth, shiny panes. Don’t rush the cooling process; allow the cookies to rest on the baking sheets for 5 to 10 minutes so the candy centers firm up nicely. Then, carefully transfer the cookies to wire racks to cool completely. This cooling step is crucial for keeping those stained glass centers intact and brilliant.
Step 5: Dust and Decorate
Once your cookies are fully cooled, add a light dusting of powdered sugar over the edges for a delicate, festive touch. If you’re planning to turn your beauties into hanging ornaments, poke a small hole near the top of each cookie with a straw while they’re still warm, then thread with ribbon or string once cooled completely. This extra step adds a whimsical charm, perfect for holiday decorating or gifting.
How to Serve Stained Glass Cookies Recipe
Garnishes
A simple powdered sugar dusting adds an elegant finishing touch to your stained glass cookies, giving them a frosted, snowy effect that highlights the vibrant candy centers. You can also sprinkle finely chopped nuts or edible glitter around the cookie edges if you want to spice things up and add texture.
Side Dishes
Stained glass cookies pair beautifully with classic hot beverages. Serve them alongside a warm mug of spiced chai, hot cocoa, or freshly brewed coffee to create an inviting snack or dessert experience. Their buttery sweetness complements warm, comforting drinks perfectly.
Creative Ways to Present
Try presenting these cookies as charming edible ornaments on a holiday cookie tray or tied in small gift bags for friends and neighbors. You can also arrange different colored stained glass cookies together on a decorative platter to create a dazzling rainbow effect. For a party, use edible paints or icing to add delicate details around the edges, personalizing each cookie with festive designs or names.
Make Ahead and Storage
Storing Leftovers
You can store leftover stained glass cookies in an airtight container at room temperature for up to one week. Keep parchment paper between layers to protect the delicate candy centers from sticking or breaking. This way, your cookies stay fresh and glossy, ready to enjoy any time.
Freezing
If you want to prepare cookies ahead of time, freeze the unbaked cookie dough disk tightly wrapped for up to three months. When ready, thaw in the fridge overnight, then roll and cut as usual. Baked cookies can also be frozen for up to a month by placing them in a single layer on a baking sheet until firm, then transferring to a sealed container with layers separated by parchment paper. This preserves their texture and appearance beautifully.
Reheating
Since stained glass cookies are best enjoyed fresh or at room temperature, avoid reheating in a microwave as it may cloud the candy centers or make the cookies soft. Instead, bring them to room temperature naturally to maintain that perfect delicate bite and sparkling candy windows.
FAQs
Can I use other types of candy for the stained glass centers?
Yes! While Jolly Ranchers and Life Savers are popular choices because they melt evenly and offer vibrant colors, you can experiment with other clear hard candies. Just make sure they don’t have fillers or coatings that might affect melting.
What should I do if the candy centers bubble or overflow?
If you notice bubbling or overflow, it usually means the candies are crushed too coarsely or there’s too much candy in the center. Try crushing the candy more finely and filling just the cut-out space without piling too high to prevent this.
Why did my cookie dough crack when rolling out?
Cracking dough usually means it’s too cold or dry. Let it sit at room temperature for a few minutes before rolling, and make sure it’s well chilled but pliable. If it’s too dry, a small splash of milk or water can help on your next batch.
Can I make this recipe gluten-free?
Absolutely! Substitute the all-purpose flour with a gluten-free flour blend designed for baking. Keep in mind that texture might be slightly different, but the stained glass effect remains stunning.
How long do the stained glass cookies stay fresh?
Stored properly in an airtight container at room temperature, these cookies stay fresh for about a week. The candy centers can lose their shine if exposed to humidity, so keep them in a cool, dry place.
Final Thoughts
The Stained Glass Cookies Recipe is a delightful way to bring color, sparkle, and delicious flavor into your kitchen. Whether you’re baking for a festive occasion or simply craving a fun project that yields stunning, tasty results, these cookies offer a joyful combination of classic buttery dough and jewel-toned candy windows that impress every time. Gather your ingredients, invite some friends or family, and get ready to create edible works of art that everyone will love to eat and admire.
PrintStained Glass Cookies Recipe

These Stained Glass Cookies are a delightful holiday treat featuring buttery sugar cookies with colorful melted candy centers that resemble beautiful stained glass windows. Perfect for festive occasions or as charming edible ornaments, these cookies combine classic flavors with a dazzling visual appeal.
- Prep Time: 20 minutes
- Cook Time: 10 minutes
- Total Time: 1 hour 30 minutes
- Yield: 24 cookies 1x
- Category: Dessert, Cookies
- Method: Baking
- Cuisine: American
- Diet: Vegetarian
Ingredients
For the Cookies
- 2 ¾ cups all-purpose flour
- 1 teaspoon baking powder
- ¼ teaspoon salt
- 1 cup (2 sticks) unsalted butter, softened
- 1 cup granulated sugar
- 1 large egg
- 1 teaspoon vanilla extract
- ½ teaspoon almond extract (optional)
For the Stained Glass
- Assorted hard candies (such as Jolly Ranchers or Life Savers), separated by color and crushed
For Decorating
- Powdered sugar (for dusting)
- Ribbon or string (if hanging as ornaments)
Instructions
- Prepare the Dough: In a medium bowl, whisk together the flour, baking powder, and salt. In a separate large mixing bowl, cream the softened butter and granulated sugar with an electric mixer on medium speed until light and fluffy, about 2–3 minutes. Beat in the egg, vanilla extract, and almond extract if using, scraping down the sides of the bowl as needed. Gradually add the dry ingredients to the wet mixture, mixing just until combined. Form the dough into a disk, wrap tightly in plastic wrap, and refrigerate for at least 1 hour or up to 2 days.
- Prepare the Candies: While the dough chills, place separated hard candies into zip-top bags by color. Use a rolling pin or meat mallet to crush the candies into small pieces, ensuring they are not too fine or too coarse. Set the crushed candy aside in bowls by color.
- Shape the Cookies: Preheat the oven to 350°F (175°C) and line two baking sheets with parchment paper. On a lightly floured surface, roll out the chilled dough to about ¼-inch thickness. Use large cookie cutters to cut out shapes, then use a smaller cutter of the same shape to cut out the centers. Transfer the cookies to prepared baking sheets and spoon crushed candy into the center of each cookie, spreading it evenly to fill the cut-out space.
- Bake and Cool: Bake the cookies for 8–10 minutes, or until the edges are just turning golden and the candy centers have melted. Allow the cookies to cool on the baking sheets for 5–10 minutes so the centers can firm up. Carefully transfer to wire racks to cool completely.
- Dust and Decorate: Once the cookies are completely cool, dust the outer edges with powdered sugar if desired. For ornament cookies, use a straw to poke a small hole at the top of each cookie while still warm, then thread with ribbon or string after cooling fully.
Notes
- Ensure the crushed candy pieces are not too fine to prevent the candy from burning or spreading too much during baking.
- The almond extract is optional but adds a nice depth of flavor if included.
- To make cookie ornaments, poke the hole while the cookies are still warm to avoid cracking.
- You can store these cookies in an airtight container at room temperature for up to one week.
- If desired, try using different shaped cookie cutters to create a variety of designs.
Nutrition
- Serving Size: 1 cookie
- Calories: 150
- Sugar: 15g
- Sodium: 60mg
- Fat: 7g
- Saturated Fat: 4g
- Unsaturated Fat: 3g
- Trans Fat: 0g
- Carbohydrates: 21g
- Fiber: 0.5g
- Protein: 2g
- Cholesterol: 30mg
Keywords: stained glass cookies, holiday cookies, Christmas cookies, sugar cookies, edible ornaments, festive cookies, hard candy cookies

