
Easy Refrigerator Pickled Vegetables (Crunchy & Tangy!) Recipe
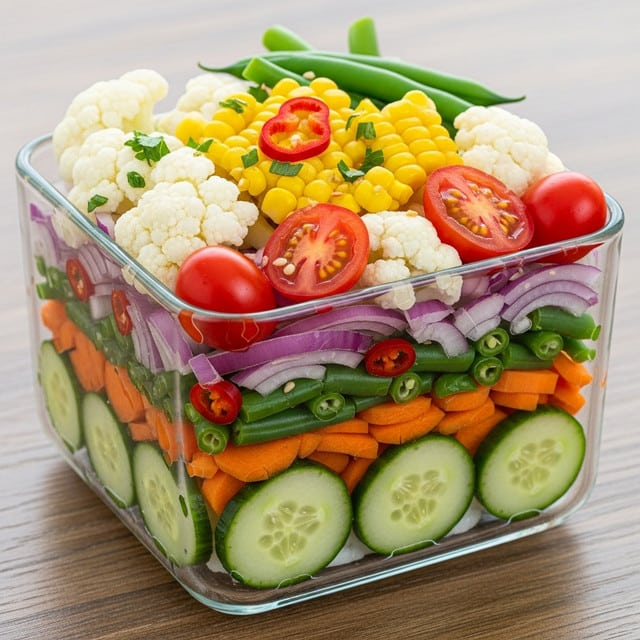
If you are craving a delicious, zesty snack that’s bursting with vibrant veggies, you have to try this Easy Refrigerator Pickled Vegetables (Crunchy & Tangy!) recipe. It’s a fantastic way to enjoy fresh cauliflower, carrots, cucumbers, and more, all soaked in a bright, tangy brine that enhances their natural crunch. This recipe is not only super quick to prepare but also incredibly flexible, making it a perfect addition to your fridge for those moments when you want a nutritious, flavorful bite without any fuss. Trust me, once you make these crunchy pickled veggies, they’ll become your go-to snack or side dish for everything from sandwiches to charcuterie boards.
Ingredients You’ll Need
Getting started with this recipe is as simple as gathering a handful of fresh, crisp vegetables and a carefully balanced set of pickling components. Each ingredient plays an essential role: the vegetables add texture and color, while the spices and brine create that unmistakable tangy punch you’ll love.
- 2 cups crisp cauliflower florets: The star of crunchiness with a mild, nutty flavor perfect for pickling.
- 1 cup sliced carrots (coins): Adds a lovely sweetness and bright orange pop.
- 1 cup sliced cucumbers (about 1/4-inch thick): Brings refreshing coolness and subtle flavor balance.
- 1 red bell pepper, sliced: For vibrant color and a sweet hint that lifts the mix.
- 1 cup fresh green beans, trimmed: Provides crisp snap and a lovely green contrast.
- 3 cloves garlic, minced: Adds a potent, savory depth that infuses the brine.
- 2 tsp mustard seeds: Contributes a mild pungency and crunchy texture.
- 1 tsp whole black peppercorns: Offers subtle heat and aromatic complexity.
- 1/2 tsp red pepper flakes (optional): A little heat for those who love a spicy kick.
- 2 cups white vinegar (5% acidity): The essential tangy base that preserves and flavors the veggies.
- 2 cups water: Balances the vinegar to make a perfect brine.
- 2 tbsp kosher or pickling salt: Helps draw out flavors and preserve the veggies.
- 1 tbsp sugar: Rounds out the acidity with a touch of sweetness.
How to Make Easy Refrigerator Pickled Vegetables (Crunchy & Tangy!)
Step 1: Prep the Vegetables
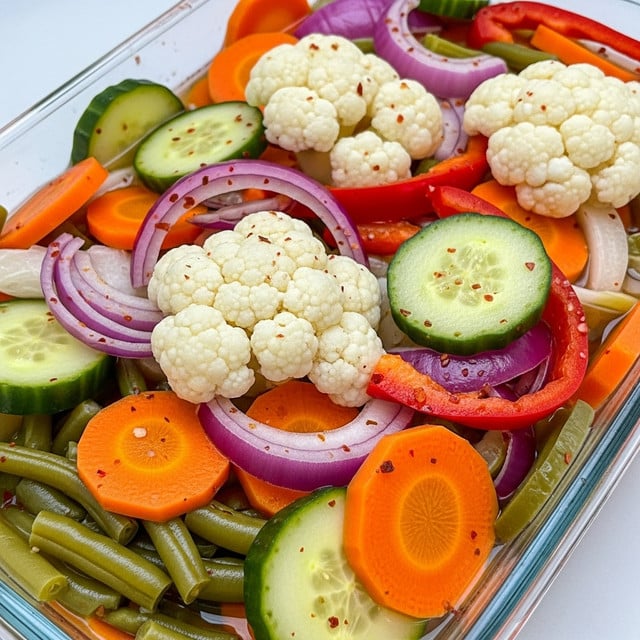
The first step is to wash and cut your vegetables into uniform, bite-sized pieces. Slice the carrots into coins, break cauliflower into small florets, slice cucumbers about one-quarter inch thick, and trim the green beans. This uniformity ensures even pickling and a delightful consistency every time.
Step 2: Make the Brine
In a medium saucepan, combine the white vinegar, water, kosher salt, sugar, minced garlic, mustard seeds, black peppercorns, and if you want a touch of heat, red pepper flakes. Bring this mixture to a rolling boil over medium-high heat, stirring until the salt and sugar dissolve completely. This hot brine will infuse your veggies with that signature crunchy and tangy flavor.
Step 3: Pour the Brine Over the Veggies
Next, place all your prepped vegetables in a large heat-proof bowl. Carefully pour the steaming hot brine over them, pressing down gently to make sure everything is fully submerged. Let this cool to room temperature for about one hour. This step is crucial because it allows the flavors to meld beautifully while maintaining that satisfying crunch.
Step 4: Jar and Cover
Once the veggies have soaked up the brine and cooled, pack them tightly into clean glass jars. Ladle the brine over the packed vegetables to ensure they’re fully covered. If you find you don’t have quite enough liquid, simply top it off with a 50/50 mixture of vinegar and water. Seal the jars securely with lids to lock in all that tangy goodness.
Step 5: Chill
Refrigerate the jars for at least 24 hours before digging in, though the flavor deepens and the crunch improves best after 3 to 5 days. Keep your pickled vegetables refrigerated and enjoy them within 2 to 3 weeks to savor the peak of their crunchy, tangy awesomeness!
How to Serve Easy Refrigerator Pickled Vegetables (Crunchy & Tangy!)
Garnishes
Sprinkle your pickled vegetables with some freshly chopped herbs like dill or parsley right before serving. This adds a fresh, aromatic pop that perfectly complements their tangy zing. A light drizzle of olive oil or a pinch of toasted sesame seeds also amps up both flavor and texture.
Side Dishes
These pickled veggies make a superb side for grilled meats and sandwiches. Think of them as the perfect palate cleanser alongside spicy dishes or rich, creamy foods like hummus or cheeses. They also shine when paired with rice bowls or tucked into tacos for a refreshing, crunchy bite.
Creative Ways to Present
For an eye-catching appetizer, arrange these colorful pickled vegetables on a platter alongside crusty bread, a selection of cheeses, and cured meats. You can also chop them finely and mix into salads, grain bowls, or even add them to deviled eggs for an exciting twist. The possibilities are endless, making this recipe a party-friendly favorite.
Make Ahead and Storage
Storing Leftovers
Once jarred, your Easy Refrigerator Pickled Vegetables (Crunchy & Tangy!) keep beautifully in the fridge for about 2 to 3 weeks. The acidic brine naturally preserves the veggies, letting you enjoy that satisfying crunch well after the initial prep day. Always use a clean fork or spoon to avoid contamination and keep flavors pure.
Freezing
While pickled vegetables are best enjoyed fresh from the fridge, freezing is not recommended since it can alter the texture and cause the vegetables to lose their crispness. Instead, focus on eating them within the best window for ideal flavor and crunch.
Reheating
One of the best parts about this recipe is you don’t need to heat your pickled veggies at all! They are meant to be enjoyed cold or at room temperature to preserve their signature crunch and tangy flavor. Pop them out of the fridge and enjoy as is, or add directly to your favorite dishes.
FAQs
Can I use other vegetables for this recipe?
Absolutely! While this recipe calls for cauliflower, carrots, cucumbers, bell peppers, and green beans, you can experiment with radishes, cherry tomatoes, or even asparagus. Just keep pieces bite-sized and adjust pickling times if you add softer veggies.
How long will these pickled vegetables last in the fridge?
Your pickled vegetables should stay fresh and crunchy for about 2 to 3 weeks when stored properly in sealed jars in the refrigerator. Be sure to check for any off smells or sliminess before eating.
Is the brine recipe suitable for canning, or is it only for refrigerator pickles?
This brine is specifically formulated for refrigerator pickles and not for long-term shelf-stable canning. For safe canning, you’d need to follow tested canning recipes to avoid food safety issues.
Can I customize the spice level?
Definitely! The recipe includes optional red pepper flakes for a little heat, but you can adjust this up or down depending on your taste. You can also add other spices like coriander seeds or dill seeds to personalize your pickling blend.
Do I need to blanch the vegetables before pickling?
No need to blanch with this recipe. The hot brine cooks the vegetables slightly while preserving their natural crunch, so you skip the extra step, saving you time and effort.
Final Thoughts
Now that you have the recipe and all the tips to make your own Easy Refrigerator Pickled Vegetables (Crunchy & Tangy!), there’s no excuse to miss out on this vibrant, healthy delight. It’s a wonderful way to enjoy fresh veggies any time, with minimal prep and maximum flavor. Once you try making these pickles, I promise you’ll be hooked on that perfect balance of crunch and tangy zest. Give it a go and watch your fridge transform into a treasure trove of wholesome, mouthwatering snacks!
PrintEasy Refrigerator Pickled Vegetables (Crunchy & Tangy!) Recipe
This Easy Refrigerator Pickled Vegetables recipe offers a crunchy and tangy medley of cauliflower, carrots, cucumbers, bell pepper, and green beans soaked in a flavorful garlic-mustard seed brine. Quick to prepare and perfect for snacking or as a zesty side, these pickles develop their full taste after a few days in the fridge.
- Prep Time: 15 minutes
- Cook Time: 10 minutes
- Total Time: 1 hour 25 minutes (includes cooling time)
- Yield: Approximately 4 cups of pickled vegetables 1x
- Category: Side dish, Condiment
- Method: Refrigerator pickling
- Cuisine: American
- Diet: Vegetarian
Ingredients
Vegetables
- 2 cups crisp cauliflower florets
- 1 cup sliced carrots (coins)
- 1 cup sliced cucumbers (about 1/4-inch thick)
- 1 red bell pepper, sliced
- 1 cup fresh green beans, trimmed
- 3 cloves garlic, minced
Brine
- 2 tsp mustard seeds
- 1 tsp whole black peppercorns
- 1/2 tsp red pepper flakes (optional)
- 2 cups white vinegar (5% acidity)
- 2 cups water
- 2 tbsp kosher or pickling salt
- 1 tbsp sugar
Instructions
- Prep vegetables: Wash all vegetables thoroughly. Cut the carrots into coin slices, break the cauliflower into small florets, slice cucumbers about 1/4-inch thick, slice the red bell pepper, and trim the green beans. Ensure all pieces are uniform and bite-sized for even pickling.
- Make brine: In a medium saucepan, combine the white vinegar, water, kosher salt, sugar, minced garlic, mustard seeds, black peppercorns, and red pepper flakes if using. Bring the mixture to a rolling boil over medium-high heat, stirring occasionally until the salt and sugar completely dissolve.
- Pour over veggies: Place all the prepared vegetables into a large heat-proof bowl. Carefully pour the hot brine over the vegetables, pressing them down gently to ensure they are fully submerged. Allow the mixture to cool at room temperature for about 1 hour to absorb flavors and reach safe handling temperature.
- Jar and cover: Pack the vegetables tightly into clean, sterilized glass jars. Ladle the cooled brine over the vegetables to cover them completely. If there isn’t enough liquid, top it off with a 50/50 mixture of vinegar and water. Seal the jars with airtight lids.
- Chill: Refrigerate the jars for at least 24 hours before eating to allow the flavors to meld. For best taste and crunch, wait 3 to 5 days. Keep refrigerated and consume within 2 to 3 weeks for optimal freshness and texture.
Notes
- Use fresh, firm vegetables to ensure crunchiness in your pickles.
- Adjust red pepper flakes amount to control the spice level.
- Make sure jars and lids are clean and sterilized to prevent spoilage.
- The pickles are best eaten within 2 to 3 weeks when kept refrigerated.
- For a stronger tang, increase vinegar slightly but keep balance with water.
- These are refrigerator pickles and should not be canned for shelf storage.
Nutrition
- Serving Size: 1/2 cup
- Calories: 25
- Sugar: 1.5 g
- Sodium: 550 mg
- Fat: 0 g
- Saturated Fat: 0 g
- Unsaturated Fat: 0 g
- Trans Fat: 0 g
- Carbohydrates: 5 g
- Fiber: 1.5 g
- Protein: 1 g
- Cholesterol: 0 mg
Keywords: refrigerator pickles, pickled vegetables, quick pickles, tangy pickles, crunchy veggies, easy pickles, homemade pickles


