
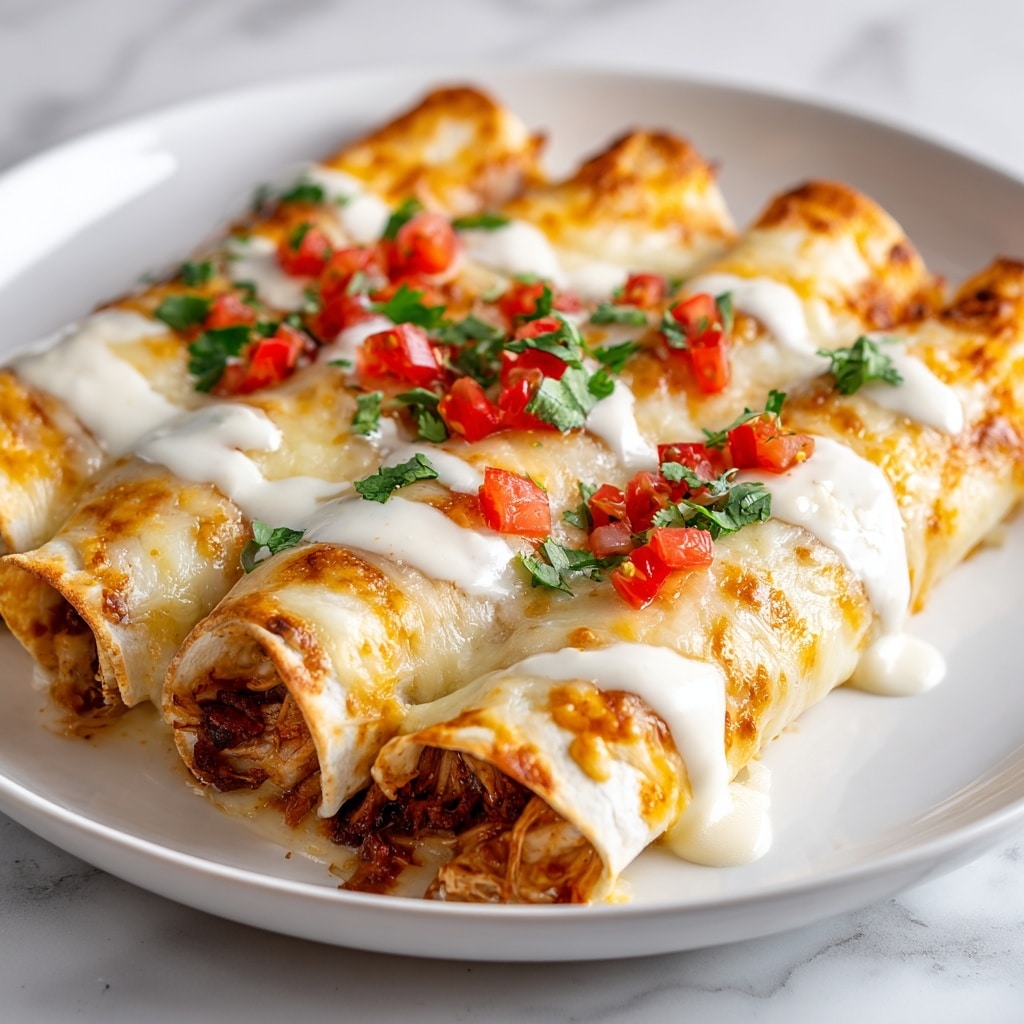
Baked Cream Cheese Chicken Taquitos Recipe
Introduction
Baked Cream Cheese Chicken Taquitos are a deliciously crispy and creamy snack or meal that’s easy to make at home. Filled with shredded chicken, cream cheese, and flavorful spices, these taquitos bake to golden perfection and are perfect for dipping.

Ingredients
- 2 cups cooked shredded chicken (rotisserie chicken works perfectly)
- 4 oz cream cheese, softened at room temperature
- ½ cup shredded cheddar or Monterey Jack cheese
- ¼ cup salsa, your preferred heat level
- 1 teaspoon ground cumin
- 1 teaspoon chili powder
- Salt and freshly ground black pepper to taste
- ¼ cup chopped green onions or fresh cilantro (optional for freshness)
- 8-10 small flour or corn tortillas, 6-inch size
- Cooking spray or olive oil for brushing
- Guacamole, sour cream, salsa, or fresh pico de gallo for dipping
- Shredded lettuce, diced tomatoes, or extra cheese for garnish (optional)
Instructions
- Step 1: Preheat your oven to 400°F and line a baking sheet with parchment paper or lightly grease it. Warm your tortillas in the microwave for 20-30 seconds to make them pliable and prevent cracking when rolled.
- Step 2: In a mixing bowl, combine the shredded chicken, softened cream cheese, shredded cheese, salsa, cumin, chili powder, salt, and pepper. Mix well until creamy and fully combined. If using, fold in the chopped green onions or cilantro.
- Step 3: Place a warm tortilla on your work surface and spoon 2-3 tablespoons of the chicken mixture down the center. Roll the tortilla tightly around the filling, tucking the seam underneath as you place it on the prepared baking sheet. Repeat with all tortillas and filling.
- Step 4: Lightly brush or spray each taquito with olive oil or cooking spray to help them crisp up while baking. Optionally, sprinkle extra shredded cheese on top for added cheesiness.
- Step 5: Bake the taquitos for 15-20 minutes, flipping halfway through to ensure even crispiness on all sides. For extra crunch, broil for 1-2 minutes at the end, watching closely to prevent burning.
- Step 6: Let the taquitos cool for 2-3 minutes after baking, then serve with your favorite dipping sauces like guacamole, sour cream, salsa, or fresh pico de gallo. Garnish with shredded lettuce, diced tomatoes, or cheese if desired.
Tips & Variations
- Use rotisserie chicken for quick preparation or cook and shred your own chicken breasts for a fresher option.
- Try using corn tortillas for a gluten-free alternative; warming them well helps prevent cracking.
- For a spicier kick, add a pinch of cayenne pepper or use a hotter salsa.
- Add finely diced jalapeños or a squeeze of lime juice to the filling for extra flavor.
- Leftover taquitos can be reheated in the oven to maintain crispiness rather than the microwave.
Storage
Store leftover baked taquitos in an airtight container in the refrigerator for up to 3 days. Reheat them in a preheated oven at 350°F for about 10 minutes to keep them crispy. Avoid microwaving if you want to retain the crunchy texture.
How to Serve
Serve this delicious recipe with your favorite sides.
FAQs
Can I make these taquitos ahead of time?
Yes, you can assemble the taquitos and store them in the refrigerator for a few hours before baking. Just cover the baking sheet with plastic wrap until ready to cook.
What can I use if I don’t have cream cheese?
If you don’t have cream cheese, a smooth ricotta cheese or a mild queso fresco can be used as a substitute, though the texture and flavor will be slightly different.
PrintBaked Cream Cheese Chicken Taquitos Recipe

These Baked Cream Cheese Chicken Taquitos are a deliciously creamy and crispy handheld snack or appetizer. Shredded chicken is blended with cream cheese, shredded cheese, salsa, and spices, rolled into small tortillas, and baked until golden and crunchy. Perfect for sharing with a variety of dipping sauces or enjoying as a comforting meal.
- Prep Time: 10 minutes
- Cook Time: 20 minutes
- Total Time: 30 minutes
- Yield: 8–10 taquitos 1x
- Category: Appetizer
- Method: Baking
- Cuisine: Mexican-American
- Diet: Low Fat
Ingredients
Filling
- 2 cups cooked shredded chicken (rotisserie chicken works perfectly)
- 4 oz cream cheese, softened at room temperature
- ½ cup shredded cheddar or Monterey Jack cheese
- ¼ cup salsa, your preferred heat level
- 1 teaspoon ground cumin
- 1 teaspoon chili powder
- Salt and freshly ground black pepper to taste
- ¼ cup chopped green onions or fresh cilantro (optional for freshness)
Tortillas
- 8–10 small flour or corn tortillas, 6-inch size
- Cooking spray or olive oil for brushing
Serving Suggestions
- Guacamole, sour cream, salsa, or fresh pico de gallo for dipping
- Shredded lettuce, diced tomatoes, or extra cheese for garnish (optional)
Instructions
- Preheat and prep: Preheat your oven to 400°F (204°C) and line a baking sheet with parchment paper or lightly grease it. Warm your tortillas in the microwave for 20-30 seconds to make them pliable and prevent cracking during rolling.
- Mix the creamy filling: In a mixing bowl, combine shredded chicken, softened cream cheese, shredded cheese, salsa, ground cumin, chili powder, salt, and black pepper. Mix well until creamy and evenly combined. Fold in chopped green onions or cilantro if using for added freshness.
- Roll the taquitos: Lay a warm tortilla flat on your work surface. Spoon 2-3 tablespoons of the chicken mixture down the center of the tortilla. Roll the tortilla tightly around the filling, tucking the seam underneath to secure. Place the rolled taquito seam-side down on the prepared baking sheet. Repeat with remaining tortillas and filling.
- Get them golden and crispy: Lightly brush or spray each rolled taquito with olive oil or cooking spray to help them brown and crisp up in the oven. Optionally, sprinkle additional shredded cheese on top for extra cheesiness.
- Bake to perfection: Bake the taquitos in the preheated oven for 15-20 minutes, flipping them halfway through the baking time to ensure even crisping on all sides. For extra crispiness, turn on the broiler for 1-2 minutes at the end but watch carefully to avoid burning.
- Serve with all the fixings: Let the taquitos cool for 2-3 minutes after baking. Serve with your favorite dips such as guacamole, sour cream, salsa, or pico de gallo. Garnish with shredded lettuce, diced tomatoes, or extra cheese if desired.
Notes
- Use rotisserie chicken for quick and flavorful prepared chicken.
- Warming tortillas makes them easier to roll without cracking.
- Spraying or brushing oil before baking results in crispier taquitos.
- Watch closely when broiling to prevent burning.
- For a spicy kick, increase the salsa heat level or add cayenne pepper to the filling.
- Serve immediately for best texture; leftovers can be reheated in the oven for crispiness.
Keywords: taquitos, baked chicken taquitos, cream cheese taquitos, Mexican appetizer, easy party snacks, baked tortilla rolls


