
Delicious Cassava Cake Recipe
Introduction
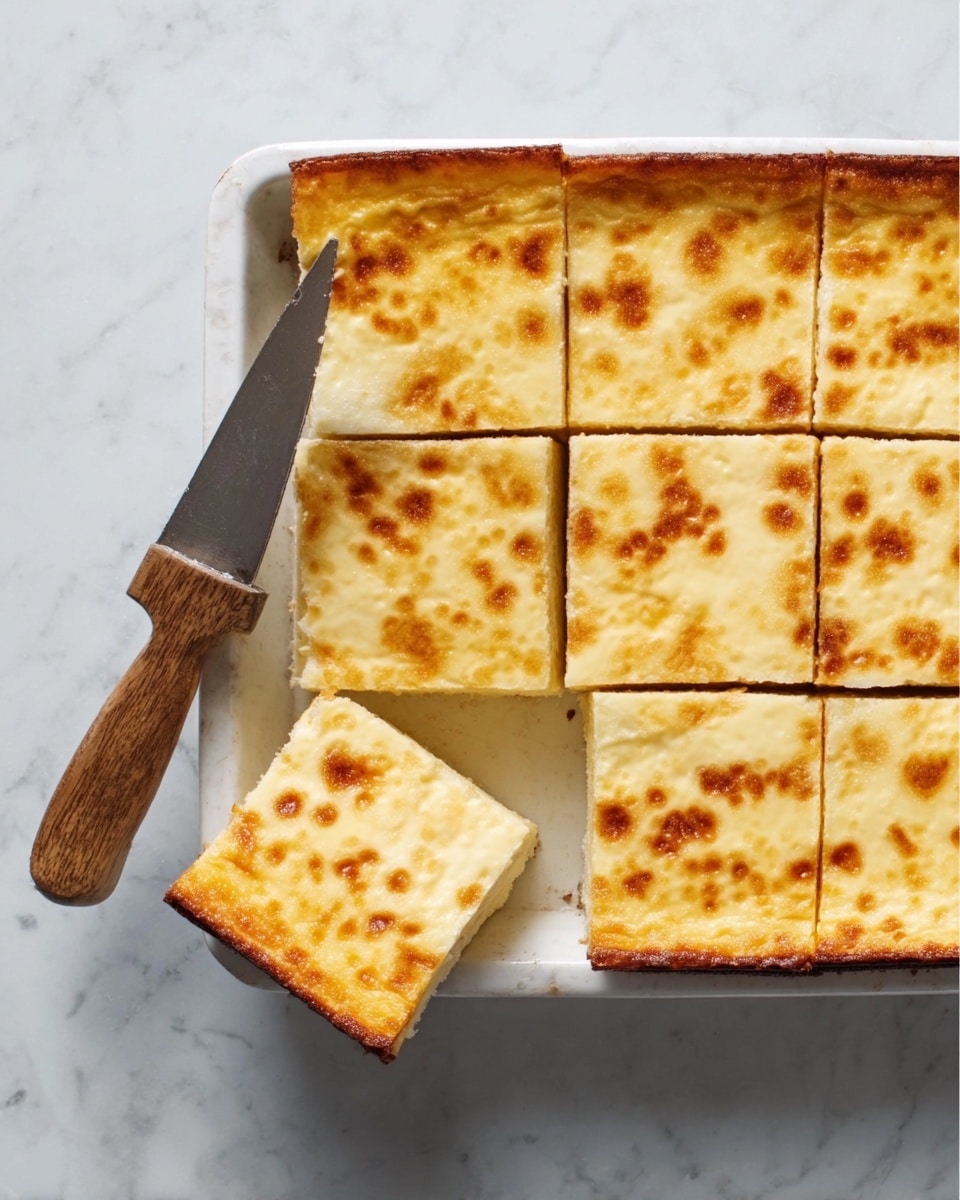
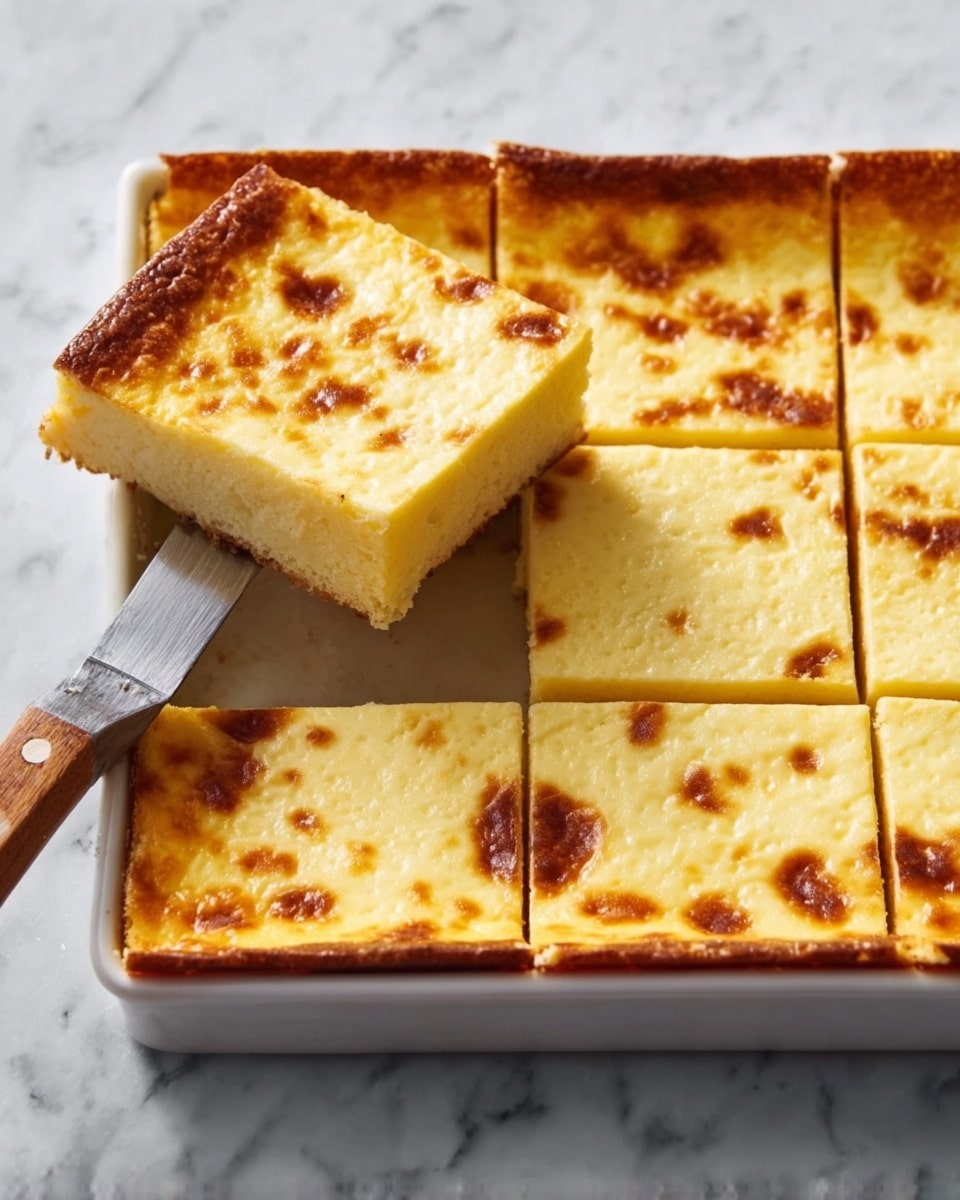
Cassava cake is a rich and creamy Filipino dessert made from grated cassava and coconut milk. This delightful treat combines a soft, chewy cake base with a sweet, custardy topping that’s sure to impress your family and friends.
Ingredients
- 3 cups grated cassava
- 1 can coconut milk
- 1 can evaporated milk
- 3 eggs
- 1/4 cup butter, melted
- 1/2 cup coconut strings (optional)
- 3/4 cup sweetened condensed milk
- 1 tsp vanilla extract
- For the topping:
- 1/2 cup condensed milk
- 1 egg yolk
Instructions
- Step 1: Preheat your oven to 375°F (190°C) and grease a baking dish with butter. Set it aside.
- Step 2: In a large bowl, combine the grated cassava, coconut milk, evaporated milk, eggs, melted butter, coconut strings (if using), sweetened condensed milk, and vanilla extract. Mix everything well until fully blended.
- Step 3: Pour the cassava mixture into the greased baking dish. Bake for 45 minutes to 1 hour, or until the cake is set and lightly golden at the edges.
- Step 4: While the cake bakes, prepare the topping by mixing the condensed milk and egg yolk in a small bowl until smooth.
- Step 5: Once the cake is baked, carefully pour the topping mixture over it. Return the baking dish to the oven and bake for another 5-8 minutes, or until the topping is cooked through and turns golden.
- Step 6: Let the cake cool completely before cutting. Refrigerate it to enhance the texture and flavor. Serve chilled and enjoy!
Tips & Variations
- For extra flavor, consider adding a handful of grated cheese on top before baking the custard layer.
- If you prefer a nuttier taste, toast the coconut strings lightly before adding them to the mixture.
- You can substitute evaporated milk with full cream milk for a lighter version.
- Use a glass or ceramic baking dish to ensure even cooking.
Storage
Store cassava cake covered in the refrigerator for up to 4 days. Keeping it chilled helps maintain its texture and flavor. Reheat briefly in a microwave or enjoy it cold for the best experience.
How to Serve
Serve this delicious recipe with your favorite sides.
FAQs
Can I use frozen grated cassava for this recipe?
Yes, frozen grated cassava works well. Just make sure to thaw and drain any excess liquid before using it in the recipe.
Is this cake gluten-free?
Yes, cassava cake is naturally gluten-free since it uses cassava root instead of wheat flour, making it suitable for those with gluten sensitivities.
PrintDelicious Cassava Cake Recipe

This delicious Cassava Cake recipe features a rich and creamy blend of grated cassava, coconut milk, and condensed milk baked to perfection. Topped with a sweet custard layer, this traditional Filipino dessert offers a moist, flavorful treat perfect for any occasion.
- Prep Time: 15 minutes
- Cook Time: 1 hour 10 minutes
- Total Time: 1 hour 25 minutes
- Yield: 8 servings 1x
- Category: Dessert
- Method: Baking
- Cuisine: Filipino
- Diet: Halal
Ingredients
Cake Ingredients
- 3 cups grated cassava
- 1 can (400 ml) coconut milk
- 1 can (354 ml) evaporated milk
- 3 large eggs
- 1/4 cup melted butter
- 1/2 cup coconut strings (optional)
- 3/4 cup sweetened condensed milk
- 1 tsp vanilla extract
Toppings
- 1/2 cup condensed milk
- 1 egg yolk
Instructions
- Prepare the baking dish: Grease a baking dish thoroughly with butter to prevent the cassava cake from sticking, then set it aside for later use.
- Mix cake ingredients: In a large bowl, combine grated cassava, coconut milk, evaporated milk, eggs, melted butter, coconut strings, sweetened condensed milk, and vanilla extract. Mix thoroughly until the mixture is uniform.
- Bake the cake: Pour the cassava mixture into the greased baking dish. Bake in a preheated oven at 375°F (190°C) for 45 minutes to 1 hour, or until the cake is firm and slightly golden.
- Prepare the topping: While the cake bakes, in a separate bowl, blend together the condensed milk and egg yolk until smooth and well combined.
- Add topping and finish baking: After the initial baking time, remove the cassava cake from the oven and pour the prepared custard topping evenly over its surface. Return to the oven and bake for an additional 5-8 minutes or until the topping is set and turns golden brown.
- Cool and refrigerate: Allow the cassava cake to cool completely at room temperature, then refrigerate it to enhance texture and flavor before serving. Enjoy chilled or at room temperature.
Notes
- Use freshly grated cassava or frozen grated cassava for best results.
- Adjust sugar level by increasing or decreasing the sweetened condensed milk based on your preference.
- The coconut strings are optional but add texture and enhance the coconut flavor.
- Ensure the topping custard is fully set before removing from the oven to achieve the classic golden finish.
- Refrigerate leftovers to maintain freshness and serve cold for a refreshing taste.
Keywords: cassava cake, Filipino dessert, coconut cake, baked cassava, sweet cassava recipe, cassava dessert


