
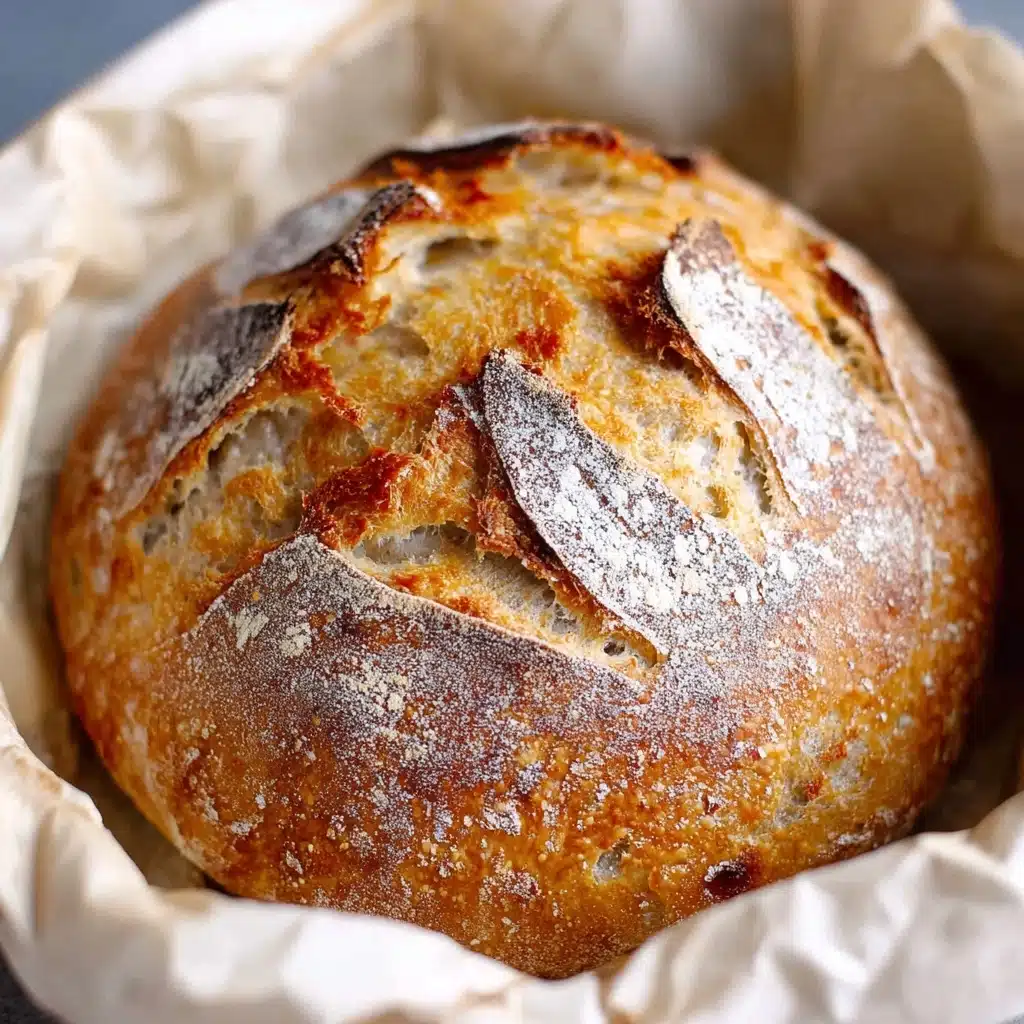
Dutch Oven No Knead Crusty Bread Recipe
If you’ve ever dreamed of baking bakery-quality bread at home without breaking a sweat, you absolutely must try this Dutch Oven No Knead Crusty Bread. It’s wonderfully simple, requiring almost no hands-on time, yet delivers a loaf with a deeply flavorful, crisp crust and an irresistibly soft, airy crumb. This recipe is perfect for anyone who wants that fresh-baked goodness with minimal fuss, locking in that classic artisan bread charm using just a few humble ingredients and a trusty Dutch oven.

Ingredients You’ll Need
The magic of this Dutch Oven No Knead Crusty Bread comes down to a handful of staple ingredients that combine effortlessly to create a loaf bursting with flavor and perfect texture. Each one plays a key role: from the warmth of the water to activate the yeast, to the right amount of salt balancing the taste, all wrapped up in the structure provided by all-purpose flour.
- Warm water (1 1/2 cups, about 100 degrees F): Activates the yeast gently, starting that beautiful fermentation process that gives the bread its wonderful rise.
- Yeast (1 packet or 2.25 teaspoons active dry, instant, or quick rise): The powerhouse that makes your loaf rise without any kneading required.
- Fine grain salt (1 ½ teaspoons): Enhances flavor and helps control yeast activity for a perfectly seasoned loaf.
- All-purpose flour (3 1/4 cups): The sturdy foundation of your bread’s structure, yielding that ideal balance of lightness and chewiness.
How to Make Dutch Oven No Knead Crusty Bread
Step 1: Mix the yeast, water, and salt
Start by combining the warm water, yeast, and salt in a large bowl or container. Use a whisk to stir them together until the yeast and salt are almost completely dissolved. This initial step gently wakes the yeast up, setting the stage for a perfect rise. Don’t worry if you see some bubbles forming — that means it’s working!
Step 2: Add the flour and stir
Add all 3 1/4 cups of flour at once. Now, mix everything together until a sticky dough forms. It will look messy and feel tacky — that’s exactly what you want! You don’t need to knead or fuss with it; just make sure all the flour is incorporated for an even texture. If it’s too wet or too dry, slightly adjust with small spoonfuls of flour or water until it matches the perfect sticky consistency.
Step 3: Let the dough rise
Cover your bowl with a kitchen towel or loosely with a lid, then let the dough rise in a comfortably warm spot for 2 to 3 hours. It should double in size and get bubbly and soft on top. If your kitchen is chilly, a cozy trick is to preheat your oven for a few minutes, turn it off, and pop the dough inside to rise in warm humidity.
Step 4: Prepare to bake
When your dough has doubled, it’s time to preheat your oven to 450 degrees F. Place your Dutch oven with its lid inside while the oven warms up so it becomes scorching hot. This step is key to achieving the bread’s signature crisp crust. Preheat for at least 30 to 60 minutes to ensure the Dutch oven is truly hot.
Step 5: Shape the loaf
Flour a piece of parchment paper generously and scrape your sticky dough onto it. Quickly fold the edges up to shape the dough into a rough loaf. Using the parchment sides, flip the loaf so the floured surface is on top. It doesn’t have to be perfect — rustic charm is part of the appeal here!
Step 6: Score and bake
Optionally score the loaf with a sharp knife or razor blade to help control how it expands in the oven and create beautiful decorative slashes. Carefully remove the Dutch oven from the oven and lift the dough with the parchment into it. Cover with the lid and bake for 35 minutes (or 40 if chilled dough). Remove the lid and bake 5 to 10 more minutes until the loaf develops a glorious deep golden crust. Cool it on a wire rack for at least 10 minutes before slicing.
How to Serve Dutch Oven No Knead Crusty Bread
Garnishes
This bread loves a little extra love when it hits the table. Try sprinkling flaky sea salt or brushing the top with herb-infused olive oil just after baking, adding a flavorful shine that’s as beautiful as it is delicious.
Side Dishes
The perfect companion to soups, stews, and hearty salads, this crusty bread is excellent for dipping or mopping up sauces. It dazzles alongside a rich tomato soup or with a classic charcuterie board filled with cheeses, olives, and cured meats.
Creative Ways to Present
Slice thick, toast lightly, and top with smashed avocado and a sprinkle of chili flakes for a trendy snack. Or cut into cubes to make homemade croutons bursting with rustic flavor. Even use it as a base for open-faced sandwiches with fresh seasonal veggies and creamy spreads.
Make Ahead and Storage
Storing Leftovers
Wrap leftover Dutch Oven No Knead Crusty Bread tightly in a clean kitchen towel or place in a paper bag at room temperature to keep the crust crisp and the inside moist for up to 2 days.
Freezing
If you want to enjoy fresh bread anytime, slice and freeze your loaf wrapped in plastic and then foil. This method locks in freshness for up to 3 months without sacrificing texture.
Reheating
To bring your bread back to life, pop it in a preheated 350 degrees F oven for about 10–15 minutes wrapped loosely in foil for a soft crumb, or unwrap and heat directly for a renewed crust crunch.
FAQs
Can I use whole wheat flour for this recipe?
Yes, you can substitute some or all of the all-purpose flour with whole wheat flour, but the loaf may be denser and need a bit more water. Experiment with ratios to find your perfect texture.
Do I have to use a Dutch oven?
The Dutch oven’s heavy lid traps steam, which is crucial for that crisp crust. If you don’t have a Dutch oven, try using a heavy oven-safe pot with a lid or place a pan of hot water in the oven to create steam.
How long can the dough rise? Can I refrigerate it?
After the initial 2-3 hour rise, you can refrigerate the dough for up to 12 hours to develop more flavor at a slower pace. Just take it out and let it warm up a bit before baking.
What if the crust isn’t crispy enough?
Make sure your Dutch oven is thoroughly preheated and the oven is hot when the bread goes in. Baking uncovered for the last 5-10 minutes helps develop that perfect crust.
Can I add extras like herbs or cheese?
Absolutely! Stir in herbs, garlic, olives, or shredded cheese into the dough before rising to personalize your Dutch Oven No Knead Crusty Bread with exciting flavors.
Final Thoughts
Once you’ve tasted this Dutch Oven No Knead Crusty Bread fresh from your own oven, you’ll wonder why you ever bought store-bought again. Its gorgeous crust and tender crumb come together with minimal effort and maximum love, making it the kind of recipe you’ll want to share and make over and over. So grab your ingredients, heat up that Dutch oven, and treat yourself to real homemade bread magic!
PrintDutch Oven No Knead Crusty Bread Recipe
This Dutch Oven No Knead Crusty Bread recipe offers a simple, foolproof way to bake artisan-style bread at home without the need for kneading. With minimal ingredients and effortless preparation, the dough develops a deliciously crusty exterior and soft, airy interior through a slow rise and baking in a preheated Dutch oven. Perfect for beginner bakers or anyone craving fresh homemade bread with a crisp crust and tender crumb.
- Prep Time: 10 minutes
- Cook Time: 40-50 minutes
- Total Time: 2 hours 50 minutes to 3 hours (including rising)
- Yield: 1 loaf (about 8 slices) 1x
- Category: Bread
- Method: No-Knead Baking
- Cuisine: American
- Diet: Vegetarian
Ingredients
Wet Ingredients
- 1 1/2 cups warm water (about 100 degrees F)
Dry Ingredients
- 1 packet yeast (active dry, instant, or quick rise – 2.25 teaspoons)
- 1 1/2 teaspoons fine grain salt
- 3 1/4 cups all-purpose flour
Instructions
- Mix the water, yeast, and salt: In a large bowl or container, whisk together 1 1/2 cups warm water, 1 packet of yeast, and 1 1/2 teaspoons salt until the yeast and salt are fully or almost dissolved.
- Add the flour: Add 3 1/4 cups all-purpose flour all at once to the bowl and stir until a sticky dough forms. Ensure all flour is uniformly wet. If too wet, add a tablespoon or two more flour; if too dry, add more water.
- Allow to rise in a warm place: Cover the bowl with a kitchen towel or place a lid slightly ajar on the container and let the dough rise 2-3 hours until it doubles in volume. A warm spot helps, such as inside a turned-off preheated oven, or a warm room.
- Bake or refrigerate: After rising, either proceed to bake the dough or store it in the fridge for later baking as preferred.
- Preheat the Dutch oven: About 30-60 minutes before baking, preheat your oven to 450°F (230°C) with the Dutch oven (lid on) inside, allowing it to get very hot for at least 20 minutes after reaching temperature.
- Flour parchment paper and add dough: Dust a piece of parchment paper with flour and scrape the dough onto it. Shape it into a rough loaf by folding the edges up around it.
- Shape the loaf: Flip the dough over using the parchment paper edges so the floured side is on top, molding it into an oval or round shape depending on your Dutch oven.
- Score the loaf (optional): Using a sharp knife or razor blade, cut a few 1/2-inch deep slits on top of the loaf to allow for controlled expansion during baking.
- Place loaf in hot Dutch oven carefully: Remove the preheated Dutch oven from the oven, take off the lid, and transfer the dough with the parchment paper into the Dutch oven.
- Bake: Cover with the lid and bake for 35 minutes at 450°F (40 minutes if the dough was refrigerated). Then remove the lid and bake an additional 5-10 minutes until the crust is golden brown and crusty. Remove the bread and let cool on a wire rack or cutting board for at least 10 minutes, ideally 30 minutes to an hour before slicing.
Notes
- Use warm water at about 100°F to activate the yeast without killing it.
- If dough feels too sticky or too wet, add flour gradually; if too dry, add water as needed.
- Rising time depends on ambient temperature—keep dough in a warm, draft-free spot.
- You can refrigerate the dough after rising for up to 24 hours for baking later; allow extra baking time if cold.
- Use parchment paper to make transferring the dough into the Dutch oven easier and to prevent sticking.
- Scoring the dough is optional but helps control expansion during baking and adds decorative texture.
- Letting the bread cool before slicing ensures the crumb sets correctly and improves texture.
Nutrition
- Serving Size: 1 slice (1/8 loaf)
- Calories: 160
- Sugar: 0.1 g
- Sodium: 230 mg
- Fat: 0.5 g
- Saturated Fat: 0.1 g
- Unsaturated Fat: 0.3 g
- Trans Fat: 0 g
- Carbohydrates: 33 g
- Fiber: 1 g
- Protein: 5 g
- Cholesterol: 0 mg
Keywords: no knead bread, crusty bread, Dutch oven bread, homemade bread, artisan bread, easy bread recipe


