
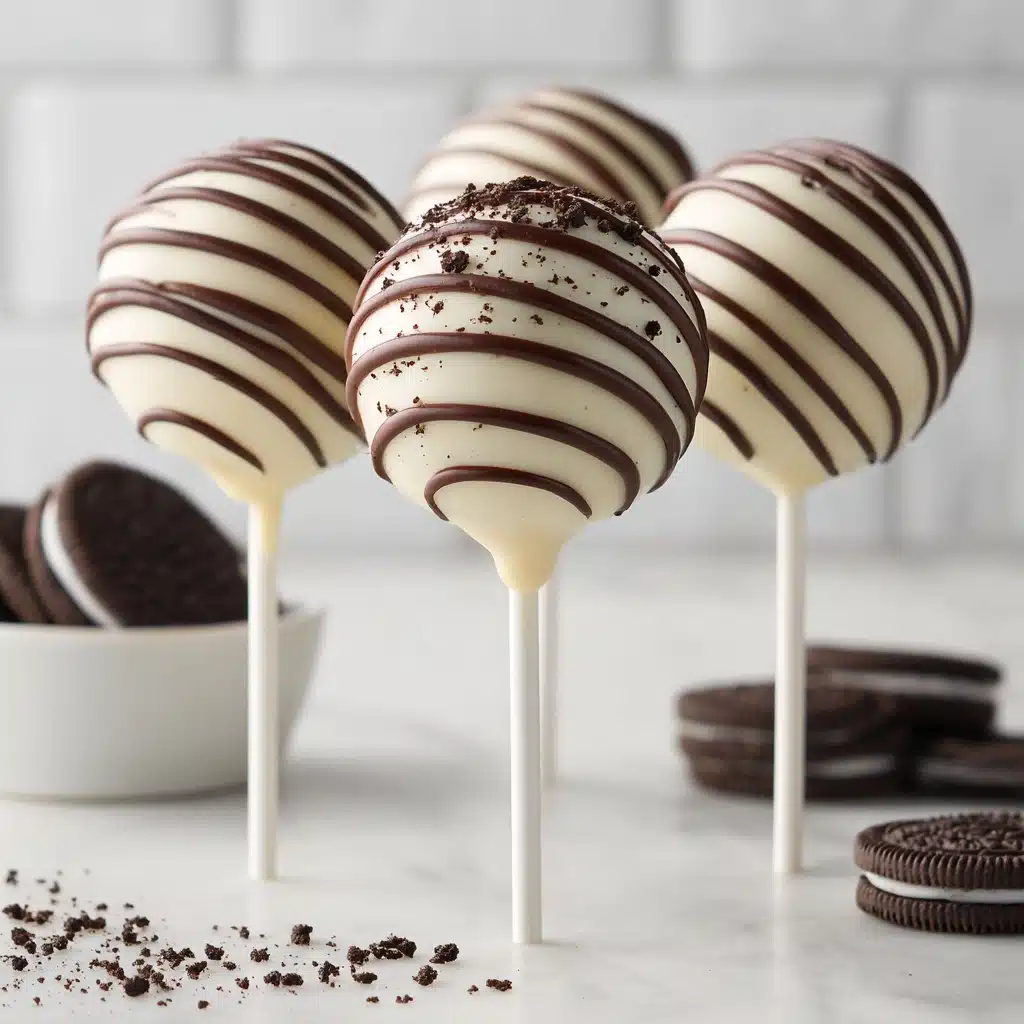
Oreo Cake Pops Recipe
If you’re looking for a treat that’s simple to make yet delivers maximum delight, Oreo Cake Pops are the answer you need. These bite-sized confections combine everyone’s favorite cookie with cream cheese and a luscious chocolate coating, making every bite an explosion of creamy, crunchy, and sweet flavors. Whether you want to impress guests at a party, give a homemade gift, or simply satisfy a chocolate craving, these cake pops fit the bill. They’re just as fun to make as they are to eat, and I promise—once you taste one, you’ll want to make them for every occasion!

Ingredients You’ll Need
You’ll be amazed at how only a handful of ingredients transform into something so delicious. Every element in Oreo Cake Pops is chosen for a reason: Oreos bring that iconic chocolatey crunch, cream cheese melds everything together into heavenly bites, and the two types of chocolate turn these pops into eye-catching wonders you can decorate to your heart’s content.
- Oreo cookies: The star of the show—these chocolate sandwich cookies add deep cocoa flavor and perfect sweetness.
- Cream cheese (softened): This creamy addition binds everything together and gives the pops their signature truffle-like texture.
- White chocolate: For a smooth, sweet coating that not only looks gorgeous but balances out the deep chocolate inside.
- Semi-sweet chocolate: Used for decorative drizzles, it provides a slightly richer accent and a beautiful finish.
- Lollipop sticks: Essential for turning simple truffles into playful, easy-to-eat cake pops.
How to Make Oreo Cake Pops
Step 1: Crush the Oreo Cookies
Start by placing your Oreo cookies in a food processor and blitzing them until you have a fine, uniform powder—no lumps or big cookie pieces. The finer you grind, the smoother your Oreo Cake Pops will be. If you don’t have a food processor, seal the cookies in a zip-top bag and crush them with a rolling pin.
Step 2: Mix in the Cream Cheese
Scoop the cream cheese into the bowl with the crushed Oreos. Blend the two together using a spoon or your hands until you have a dense, smooth dough. The cream cheese should completely incorporate with the cookie crumbs, providing just the right amount of moisture to bind everything together.
Step 3: Shape the Cake Pops
Using a tablespoon or a small cookie scoop, portion out the dough and roll it into balls—aim for about 20 grams each so they’re all evenly sized. Try not to handle them too much, as the warmth of your hands can make the dough sticky. Once all your balls are ready, set them on a lined baking sheet.
Step 4: Chill the Cake Balls
Place the tray of shaped cake balls in the fridge for 20 minutes. This quick chill helps firm them up so they’re much easier to coat and hold their shape.
Step 5: Melt the Chocolate
While your cake balls chill, melt your white chocolate using either a double boiler or in short bursts in the microwave, stirring frequently until completely smooth. Transfer melted chocolate to a deep bowl—it’ll be easier to fully coat each cake pop this way.
Step 6: Insert the Sticks
Dip the tip of each lollipop stick into the melted white chocolate, then insert it about halfway into a cake ball. This step anchors the stick in place when the chocolate sets, preventing any wobbly pops!
Step 7: Coat the Cake Pops
Now for the fun part! Gently dip each pop into the melted white chocolate, ensuring it’s fully coated. Lift it out and give it a little twist or tap to shake off excess chocolate. Place each pop upright into a cake pop stand (or a block of styrofoam) while the coating firms up.
Step 8: Decorate with Dark Chocolate
Once the white chocolate shell is set, melt your semi-sweet chocolate and transfer it to a piping bag or a zip-top bag with the corner snipped. Drizzle or pipe fun patterns and squiggles on each pop for a bakery-worthy finish. Let the decorations set before moving on.
Step 9: Final Chill
Transfer the finished cake pops back to the fridge for their final chill. Once the chocolate is fully firm, your Oreo Cake Pops are officially ready to serve, display, and enjoy!
How to Serve Oreo Cake Pops
Garnishes
Oreo Cake Pops are dazzling on their own, but a few thoughtful garnishes can take them to the next level. Try dusting with edible glitter, sprinkling with extra crushed Oreos for texture, or swirling ribbons of colored chocolate for a pop of fun. Mini chocolate chips or tiny sugar pearls also make fantastic toppers for special occasions.
Side Dishes
Though irresistibly good solo, Oreo Cake Pops pair wonderfully with simple dips—like a glass of cold milk for dunking, or a bowl of whipped cream for extra decadence. If you’re setting up a party spread, arrange alongside fresh berries, candied nuts, or even an assortment of other mini desserts for a truly celebratory platter.
Creative Ways to Present
Presentation is everything, especially for party treats like these. Place your completed pops in a decorative vase filled with colored sprinkles or pebbles to keep the sticks upright. For a more elegant look, wrap each pop in a cellophane bag tied with a ribbon. Oreo Cake Pops also look fabulous arranged in a flower foam block or nestled inside a pretty mug or mason jar—just let your imagination run wild!
Make Ahead and Storage
Storing Leftovers
Pop any leftovers in an airtight container and store them in the refrigerator. The pops will stay fresh and delicious for about 4 to 5 days. Just make sure they’re completely set and dry before stacking or arranging in the container so the coatings don’t stick together.
Freezing
If you’d like to keep your Oreo Cake Pops for longer, freezing is a great option! Arrange the finished pops on a tray and freeze until solid before transferring to a container or freezer bag. That way, they won’t stick together. When ready to eat, let them thaw in the fridge for a few hours before serving.
Reheating
No need to reheat these tasty morsels—they’re best enjoyed cold or at room temperature. However, if you want to refresh them after freezing, let them thaw completely in the fridge. Avoid microwaving, as this will melt the chocolate coating and ruin their texture!
FAQs
Can I use a different flavor of Oreo?
Absolutely! Feel free to experiment with different Oreo varieties—golden, red velvet, or even seasonal flavors all work well. Just keep to the same quantity and enjoy a new flavor twist each time you make Oreo Cake Pops.
Is there a substitute for cream cheese?
Yes, if cream cheese isn’t your thing, try using mascarpone or even thick Greek yogurt for a lighter version. The texture may change slightly, but you’ll still get delicious, truffle-like cake pops.
What’s the best way to prevent the coating from cracking?
Temperature is key! Make sure your cake pops are chilled but not frozen before dipping into warm melted chocolate. If they’re too cold, the chocolate coating can crack as it sets.
Can I make Oreo Cake Pops without a cake pop stand?
Definitely! If you don’t have a stand, use a block of styrofoam or even a colander turned upside down with wide holes to hold the pops upright while the coating sets.
How do I make them look professional?
The secret is in the details: let the excess chocolate drip off before setting, use neat and intentional drizzles or toppings, and wrap finished pops in cellophane bags with a ribbon for that gorgeous, bakery-quality look. Presentation makes all the difference!
Final Thoughts
If you haven’t tried making Oreo Cake Pops yet, give them a go—you’ll be amazed at just how easy and customizable they are. Whether it’s a bake sale, a birthday, or simply a craving for something sweet, these little wonders never disappoint. Share a batch with friends or family, and watch them disappear within moments!
PrintOreo Cake Pops Recipe

Indulge in these delicious Oreo cake pops that are perfect for parties or as a fun treat. They are easy to make and even more enjoyable to eat!
- Prep Time: 30 minutes
- Cook Time: 0 minutes
- Total Time: 50 minutes
- Yield: 20 cake pops 1x
- Category: Dessert
- Method: Mixing, Chilling, Dipping
- Cuisine: American
- Diet: Vegetarian
Ingredients
Oreo Cake Pops:
- 24 Oreo cookies (approx. 260 g)
- 70 g (1/3 cup) Cream cheese, softened
- White and semi-sweet chocolate
Instructions
- Blend Oreos: Finely blend the Oreo cookies in a food processor to a fine powder with no lumps.
- Mix Ingredients: Add the cream cheese to the Oreo powder and blend until smooth and compact.
- Shape Cake Pops: Shape 20 balls of dough into cake pops, each weighing around 20g.
- Chill: Place the Oreo cake balls in the fridge for about 20 minutes.
- Melt White Chocolate: Heat white chocolate until smooth.
- Coat Cake Pops: Dip lollipop sticks in chocolate, insert into cake pops, and coat each pop in melted chocolate.
- Set: Place cake pops on a stand to harden.
- Decorate: Decorate with melted dark chocolate using a piping bag.
- Chill and Serve: Cool cake pops in the fridge before serving.
Notes
- You can customize these cake pops with sprinkles, edible glitter, or crushed Oreos for decoration.
- Make sure the cake pops are fully set before decorating to prevent the toppings from sliding off.
- Store any leftovers in an airtight container in the refrigerator for up to 3 days.
Nutrition
- Serving Size: 1 cake pop
- Calories: 120
- Sugar: 10g
- Sodium: 80mg
- Fat: 7g
- Saturated Fat: 4g
- Unsaturated Fat: 2g
- Trans Fat: 0g
- Carbohydrates: 13g
- Fiber: 1g
- Protein: 1g
- Cholesterol: 5mg
Keywords: Oreo, Cake Pops, Dessert, Chocolate, Party Food

